Gradebook Operations APP
Introduction
Originally created for managing grade calculations according to the Chilean scale, Gradebook Operations App is an administration application that allows the management of various scheduled processes to facilitate the centralized management of grades. This includes extracting columns, calculating custom formulas, and applying various restrictions to the calculations.
Need more information? Want a demo?
Send us an email!, and we will get in touch with you schedule a demo.
Tool Access
We access the tool by logging into the platform with an administrator profile, locating the tool in the administrator tools >> Tools and utilities >> elea-customgradebook-prod. The name of this placement might vary depending on its deployment.
User Interface
Once inside the application, we find the process page, where we can visualize the following elements.
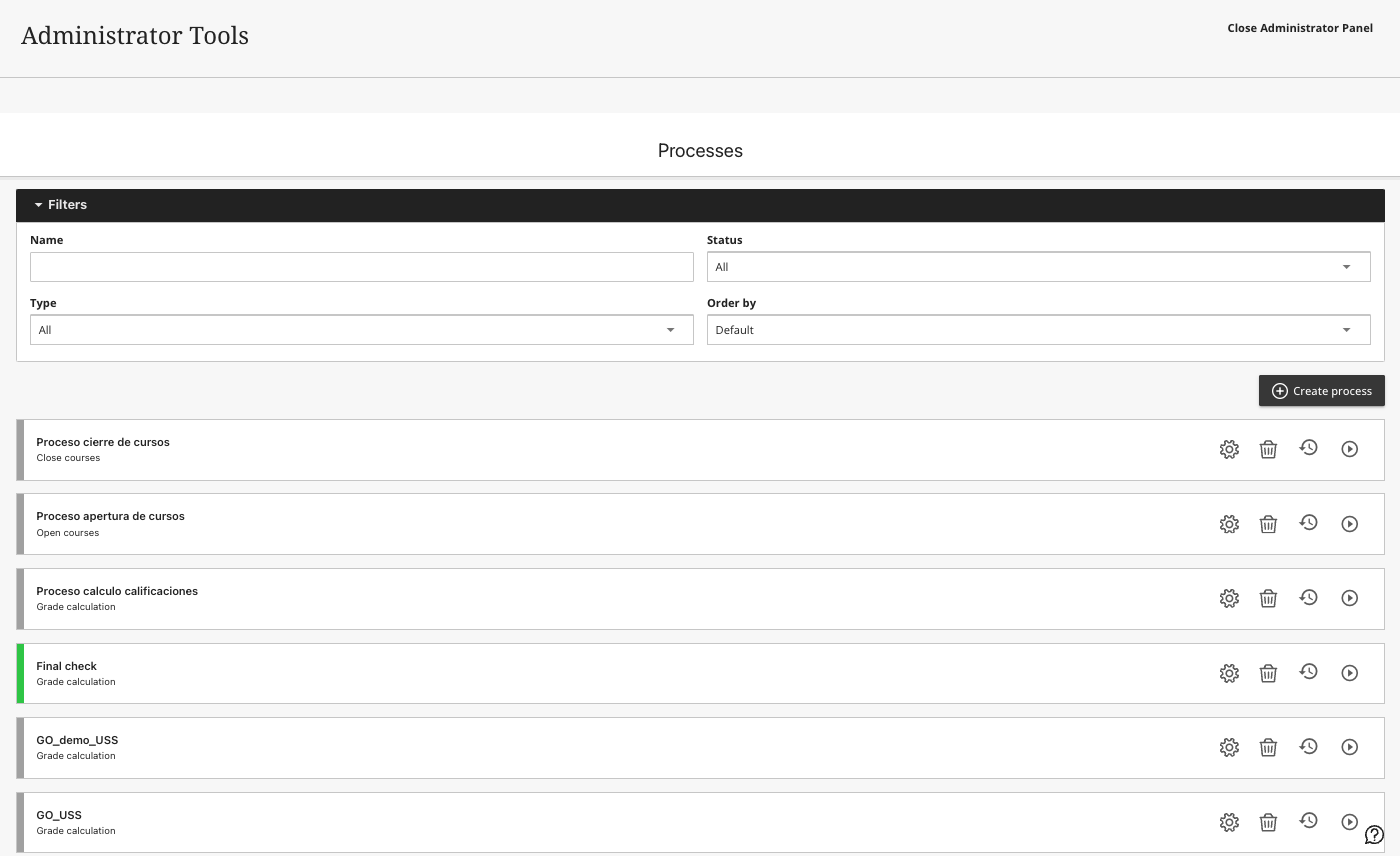
- Filters. Due to the large number of processes that DUOC can generate, filters allow efficient access to the desired processes.

2.Processes. Processes are responsible for carrying out mass actions for opening and closing courses, as well as calculating grades. They appear at the bottom of the screen, distinguished by their status with a color indicator (green for active, gray for inactive).
Similarly, it is possible to use the controls on the right side of each process to edit, delete, or execute manually.
In case of choosing manual execution, the tool will execute the process regardless of whether it is active or inactive, requiring confirmation from the user.

Common Elements in Process Creation
The creation of all types of processes in the application follows the same logic; first, we must click on the “create process” button.
This will allow us to access the process configuration.
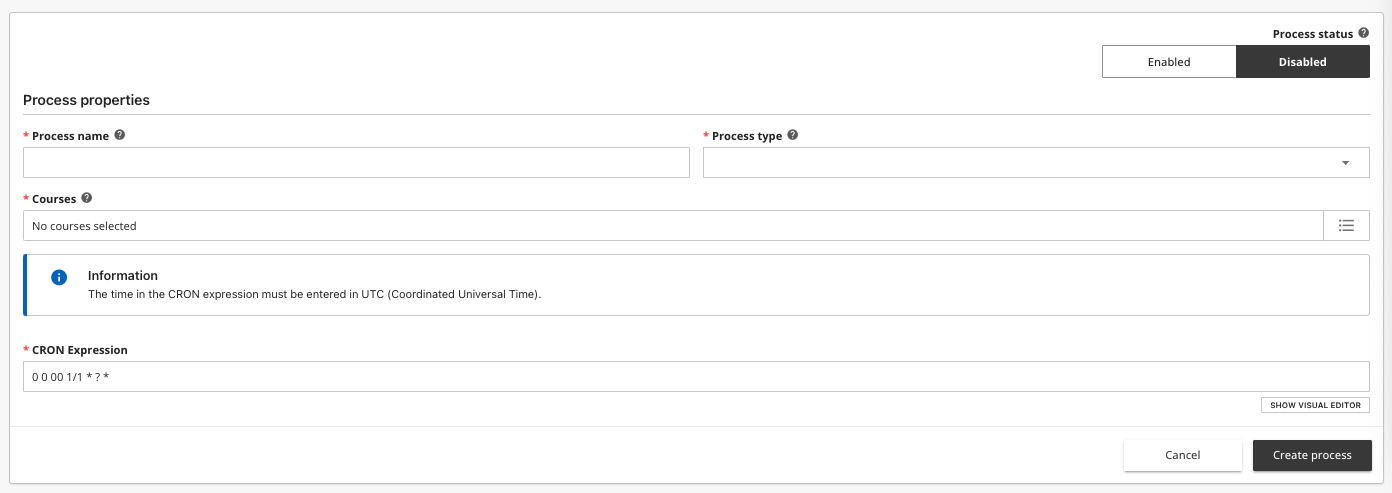
Once inside the process configuration, the following elements are common:
- Process Status. We need the process to be “Active” for the CRON scheduling to take effect.
2.Process Name, the name of the process that will allow it to be identified and apply filters on the main application page. This is a mandatory field.
3.Process Type, through this selector we choose the type of process to launch, such as opening courses, closing courses, or calculating grades.

4.Course Selection, this section allows us to indicate which set of courses the process will be carried out on, for this it is necessary to click on the icon on the right.
From here we have two options:

First, the search for courses by ID from the user interface itself (REQUIRES CONNECTION WITH BLACKBOARD DATA).
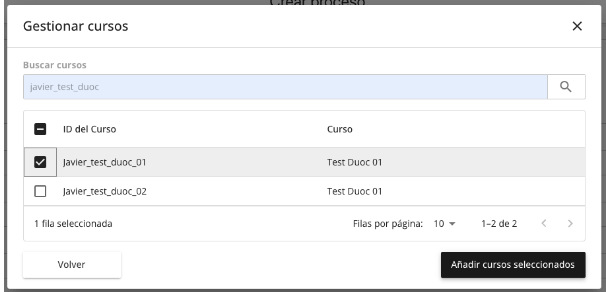
Or uploading a CSV file, whose format is simply a list of course IDs with a line return at the end of each ID.
When uploading a CSV file, confirmation is requested to avoid overwriting a previous selection.

CRON expression allows scheduling the process execution.
Although it is possible to write a CRON expression directly, the application includes a visual editor that facilitates this task, which is accessed from the show visual editor button.

The programming is intuitive and based on natural language.
Once all configurations are made, it is necessary to save the changes using the "save changes" button.
Opening and Closing of Courses
The processes for opening and closing courses only include the common elements of process creation, needing to indicate:
- Process Status (Active or inactive)
- Name
- Type of process (Opening or closing of courses)
- Course Selection
- Scheduling through CRON
Grade Calculation
Grade Calculation
For the grading processes, along with the common elements described earlier, we need to specify the properties for the calculation.

First, it is necessary to specify a formula column. This will be an existing column in the batch of courses from which the formula for the course grade is extracted. To facilitate the user's configuration task, the names of the columns extracted from the first course of the batch are offered.
It is important to understand that all courses in the same batch must contain a formula column with the same name; however, the formula can be different for each course.
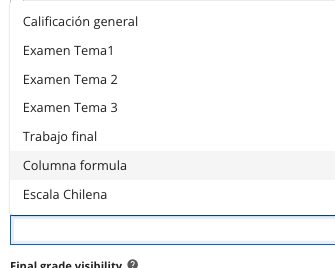
Next, it is necessary to specify a destination column to write the grades calculated according to the Chilean scale. If this column does not exist, it will be created automatically.
Then, it is possible to specify a value for the requirement according to the calculation of the Chilean scale. The default value is 60, as it is a common value. It is important to understand that all courses in the same batch must have the same requirement value for the calculations.
The next configuration relates to the normalization of the column and its visibility.

Normalization determines whether or not to apply the Chilean scale to the grade present in the final grade column. This option should be checked when the grades we want to apply the calculations to are based on 100.
Column visibility allows the columns created by the process to maintain the grade to appear as hidden or visible in the grade center. The visibility of the columns can be edited later by the instructor in the Blackboard Learn grade center.
As an optional configuration, it is possible to migrate columns, which means converting columns from the Blackboard Learn grade center directly to the Chilean scale.

To configure which columns should be migrated, click on the + symbol, which will bring up the following modal.
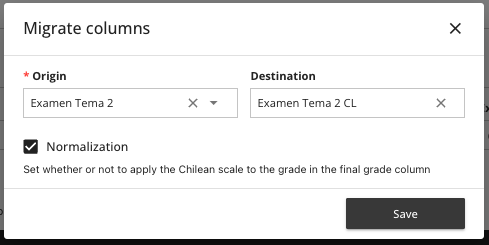
In this modal, you need to specify a source column, selecting from the dropdown among the existing columns in the course, and a destination column where the converted values will be applied.
Finally, there is the option to normalize the column. Again, this option should be checked if the grades are based on 100. Migrated columns are designed to be shown to students and not included in formulas, as this could cause issues related to their normalization (mixing columns with different bases).
Migrated columns can be deleted simply by clicking on the column itself.

Reviewing Execution History
Access to the execution history is made from the right menu on the card of the particular process.
The history area updates every 60 seconds, providing information on each execution; the elements that appear are:

- Type of process with an identifying icon
- Last execution and execution status (in progress/completed)
- Number of modifications and errors found
- Error description
Help us improve! Do you have any suggestions or improvements for this documentation? Let us know!